mirror of
https://github.com/SpaceVim/SpaceVim.git
synced 2025-02-28 09:31:34 +08:00
190 lines
6.8 KiB
Markdown
190 lines
6.8 KiB
Markdown
---
|
|
title: "Use Vim as a Java IDE"
|
|
categories: [tutorials, blog]
|
|
description: "A general guide for using SpaceVim as Java IDE, including layer configuration and requiems installation."
|
|
redirect_from: "/2017/02/11/use-vim-as-a-java-ide.html"
|
|
type: article
|
|
comments: true
|
|
commentsID: "Use Vim as a Java IDE"
|
|
---
|
|
|
|
# [Blogs](../blog/) >> Use Vim as a Java IDE
|
|
|
|
This tutorial introduces you to SpaceVim as a Java environment,
|
|
by using the `lang#java` layer, you make SpaceVim into a great lightweight Java IDE.
|
|
|
|
Each of the following sections will be covered:
|
|
|
|
<!-- vim-markdown-toc GFM -->
|
|
|
|
- [Enable language layer](#enable-language-layer)
|
|
- [Language server](#language-server)
|
|
- [Code completion](#code-completion)
|
|
- [Code outline](#code-outline)
|
|
- [Rename symbol](#rename-symbol)
|
|
- [Javadoc hovers](#javadoc-hovers)
|
|
- [Syntax lint](#syntax-lint)
|
|
- [Import packages](#import-packages)
|
|
- [Jump to test file](#jump-to-test-file)
|
|
- [Code running](#code-running)
|
|
- [Code formatting](#code-formatting)
|
|
- [REPL](#repl)
|
|
|
|
<!-- vim-markdown-toc -->
|
|
|
|
This tutorial is not intended to teach you Java itself.
|
|
|
|
If you have any problems,
|
|
feel free to join the [SpaceVim gitter chatting room](https://gitter.im/SpaceVim/SpaceVim)
|
|
for general discussion.
|
|
|
|
### Enable language layer
|
|
|
|
`lang#java` layer is not loaded by default in SpaceVim, to use SpaceVim for java,
|
|
you need to enable this layer in SpaceVim configuration file.
|
|
Press `SPC f v d` to open SpaceVim configuration file, and add following section:
|
|
|
|
```toml
|
|
[[layers]]
|
|
name = "lang#java"
|
|
```
|
|
|
|
### Language server
|
|
|
|
To enable language server protocol support, you may need to enable lsp layer.
|
|
|
|
```toml
|
|
[[layers]]
|
|
name = "lsp"
|
|
filetypes = [
|
|
"java"
|
|
]
|
|
[layers.override_cmd]
|
|
java = [
|
|
"java",
|
|
"-Declipse.application=org.eclipse.jdt.ls.core.id1",
|
|
"-Dosgi.bundles.defaultStartLevel=4",
|
|
"-Declipse.product=org.eclipse.jdt.ls.core.product",
|
|
"-Dlog.protocol=true",
|
|
"-Dlog.level=NONE",
|
|
"-noverify",
|
|
"-Xmx1G",
|
|
"-jar",
|
|
"D:\\dev\\jdt-language-server-latest\\plugins\\org.eclipse.equinox.launcher_1.5.200.v20180922-1751.jar",
|
|
"-configuration",
|
|
"D:\\dev\\jdt-language-server-latest\\config_win",
|
|
"-data",
|
|
"C:\\Users\\Administrator\\.cache\\javalsp"
|
|
]
|
|
```
|
|
|
|
You need to replace `D:\dev\jdt-language-server-latest\plugins\org.eclipse.equinox.launcher_1.5.200.v20180922-1751.jar` with the actual name of the org.eclipse.equinox.launcher jar
|
|
|
|
The configuration flag can point to either:
|
|
|
|
- `config_win`, for Windows
|
|
- `config_mac`, for MacOS
|
|
- `config_linux`, for Linux
|
|
|
|
The data flag value should be the absolute path to the working directory of the server.
|
|
This should be different from the path of the user's project files (which is sent during the initialize handshake).
|
|
|
|
### Code completion
|
|
|
|
javacomplete2 which has been included in `lang#java` layer provides omnifunc for java file and deoplete source.
|
|
with this plugin and `autocomplete` layer, the completion popup menu will be opened automatically.
|
|
|
|
|
|
|
|
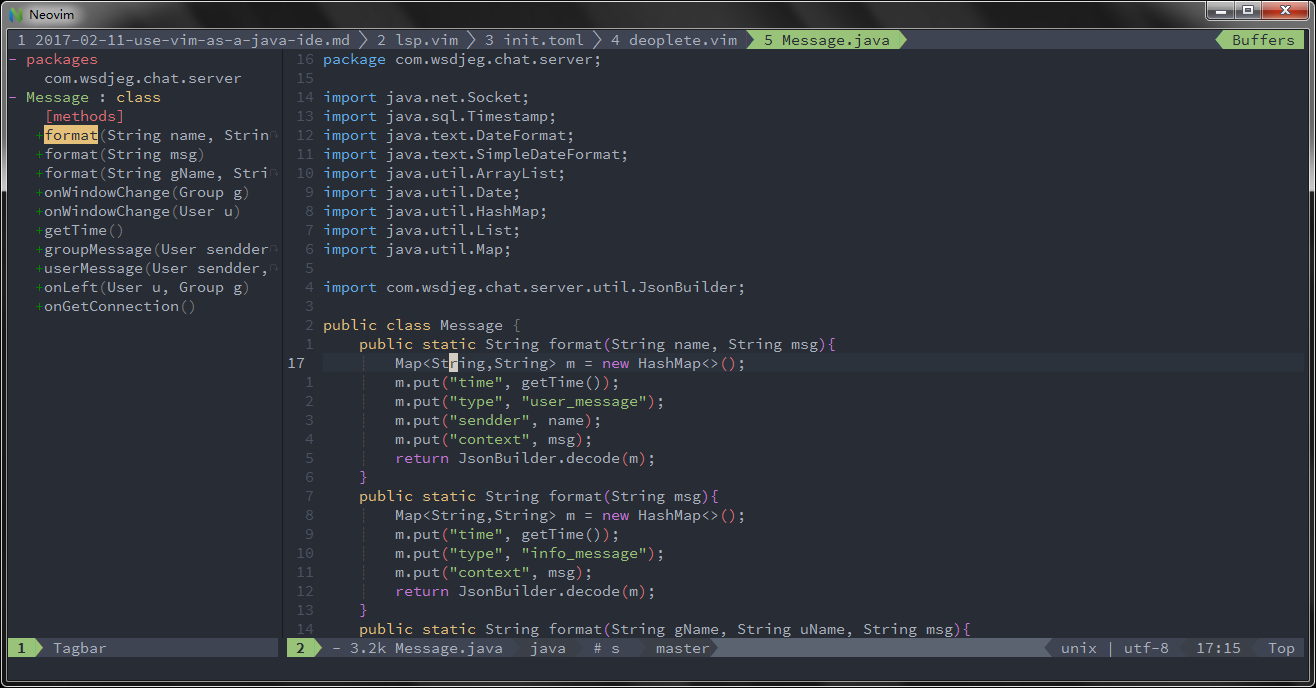
### Code outline
|
|
|
|
The default outline plugin is tagbar, and the key binding is `F2`. This key binding will open an outline sidebar on the left.
|
|
|
|
|
|
|
|
To fuzzy find outline in current buffer, you need to enable a fuzzy find layer, for example denite layer,
|
|
then press `Leader f o`:
|
|
|
|
|
|
|
|
### Rename symbol
|
|
|
|
To rename java symbol, you need to enable `lsp` layer for java. The default key binding
|
|
for rename symbol under the cursor is `SPC l e`.
|
|
|
|
|
|
|
|
### Javadoc hovers
|
|
|
|
The default key binding to get doc of cursor symbol is `SPC l d` or `K`:
|
|
|
|
|
|
|
|
### Syntax lint
|
|
|
|
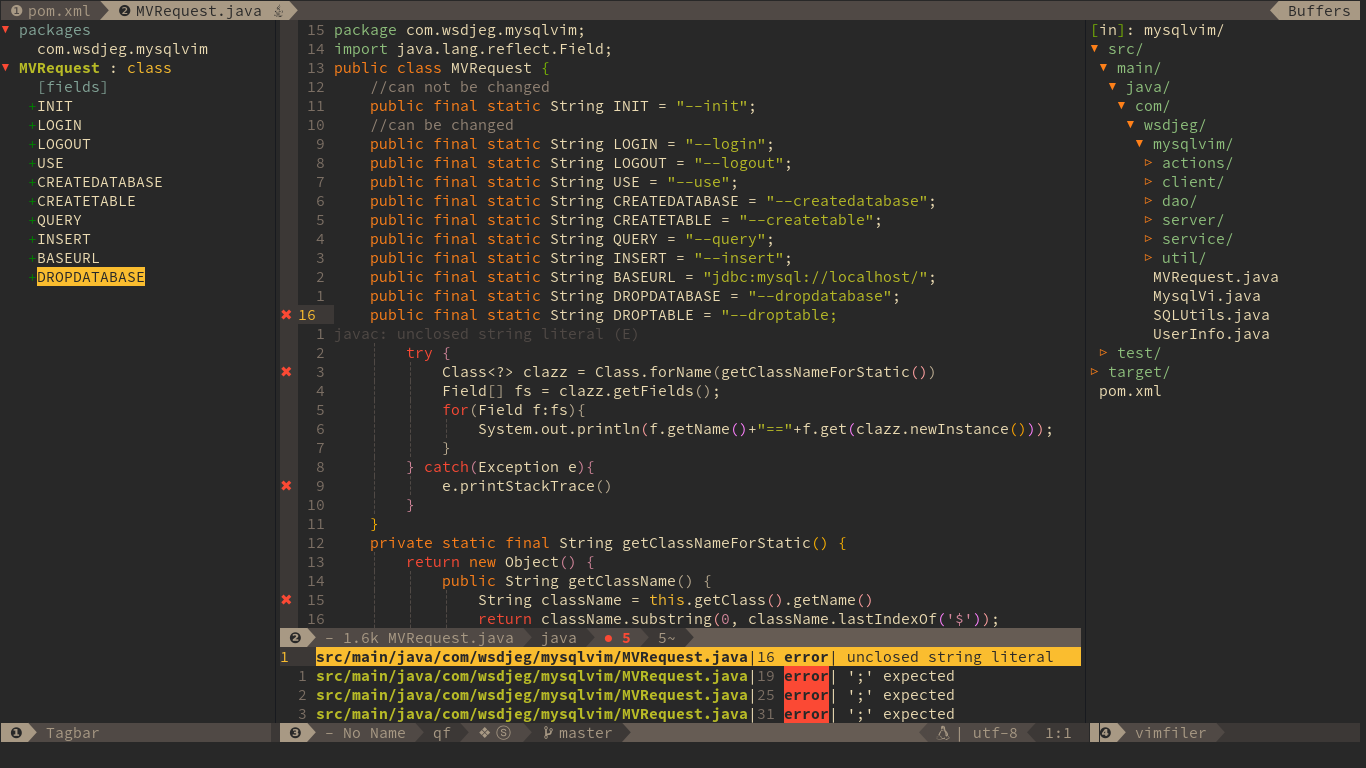
`checkers` layer provides asynchronous linting feature, this layer use [neomake](https://github.com/neomake/neomake) by default.
|
|
neomake support maven, gradle and eclipse project. it will generate classpath automatically for these project.
|
|
|
|
|
|
|
|
within above picture, we can see the checkers layer provides following feature:
|
|
|
|
- list errors and warnings in quickfix windows
|
|
- sign error and warning position on the left side
|
|
- show numbers of errors and warnings on statusline
|
|
- show cursor error and warning information below current line
|
|
|
|
### Import packages
|
|
|
|
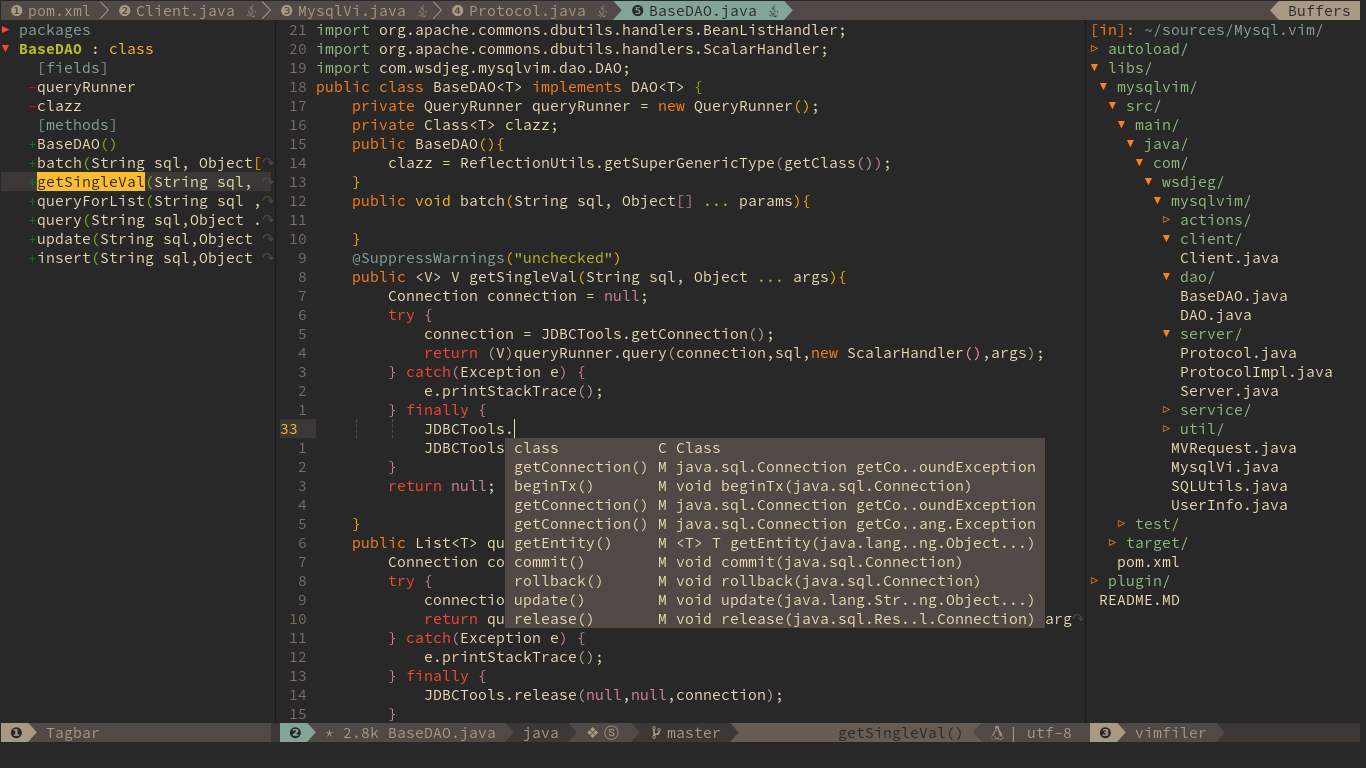
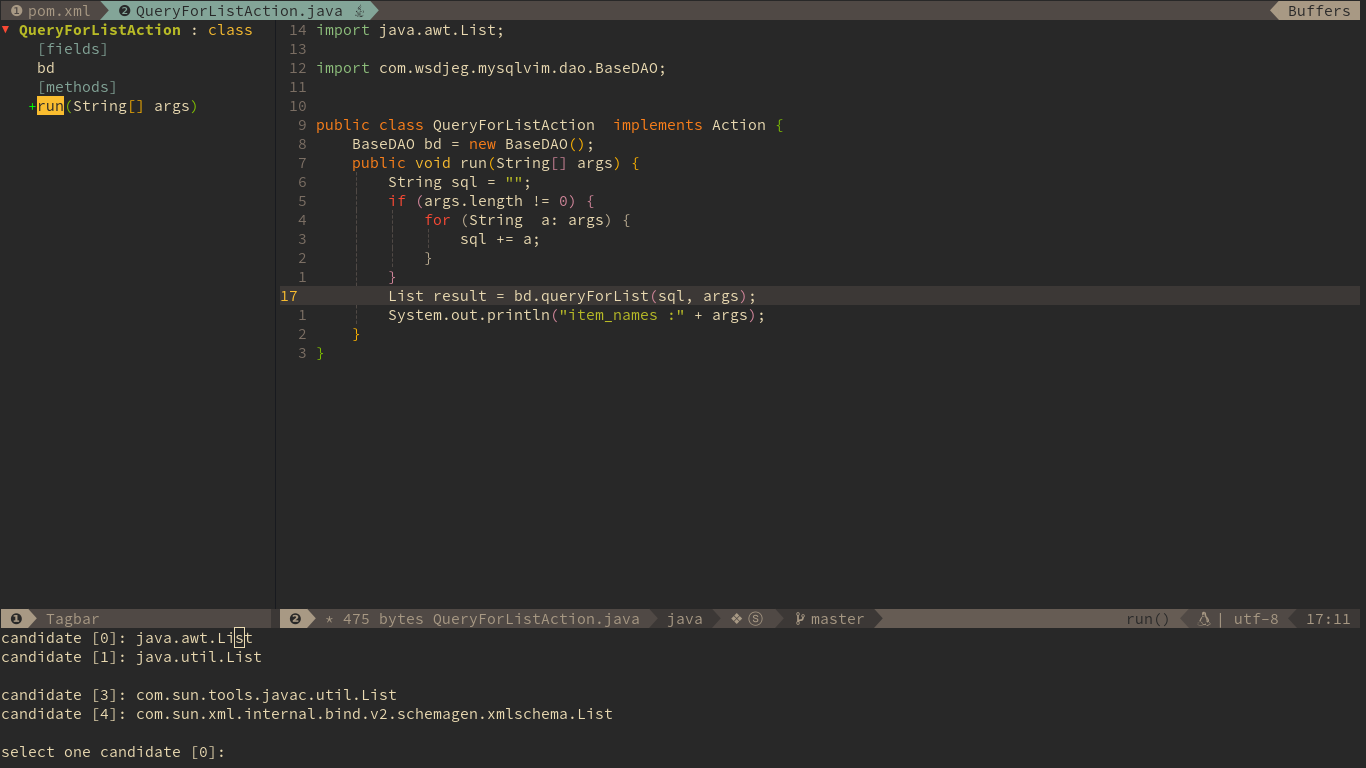
There are two kind features for importing packages, import packages automatically and manually.
|
|
SpaceVim will import the packages after selecting the class name on popmenu.
|
|
Also, you can use key binding `SPC l i` to import the class at the cursor point.
|
|
If there are more than one class, a menu will be shown below current windows.
|
|
|
|
|
|
|
|
### Jump to test file
|
|
|
|
SpaceVim uses vim-project to manager the files in a project, you can add a `.projections.json` to the root of your project with following content:
|
|
|
|
```json
|
|
{
|
|
"src/main/java/*.java": {
|
|
"alternate": "src/test/java/{dirname}/Test{basename}.java"
|
|
},
|
|
"src/test/java/**/Test*.java": { "alternate": "src/main/java/{}.java" }
|
|
}
|
|
```
|
|
|
|
with this configuration, you can jump between the source code and test file via command `:A`
|
|
|
|
|
|
|
|
### Code running
|
|
|
|
Base on JavaUnite, you can use `SPC l r c` to run current function or use `SPC l r m` to run the main function of current Class.
|
|
|
|
|
|
|
|
### Code formatting
|
|
|
|
Code formatting is provided by `format` layer, which is loaded by default.
|
|
The default format engine is `neoformat`, it will run google's [java formatter](https://github.com/google/google-java-format)
|
|
asynchronously. The key binding for formatting current file is `SPC b f`.
|
|
To use this feature, you need to download the google's java formatter jar, and set the
|
|
path of this jar file in layer option.
|
|
|
|
```toml
|
|
[[layers]]
|
|
name = 'lang#java'
|
|
java_formatter_jar = 'path/to/google-java-format.jar'
|
|
```
|
|
|
|
|
|
|
|
### REPL
|
|
|
|
you need to install jdk9 which provide a build-in tools `jshell`, and SpaceVim use the `jshell` as default inferior REPL process:
|
|
|
|
|